
Google Tag Manager & GA4 Tracking Setup — A Complete Practical Case Study
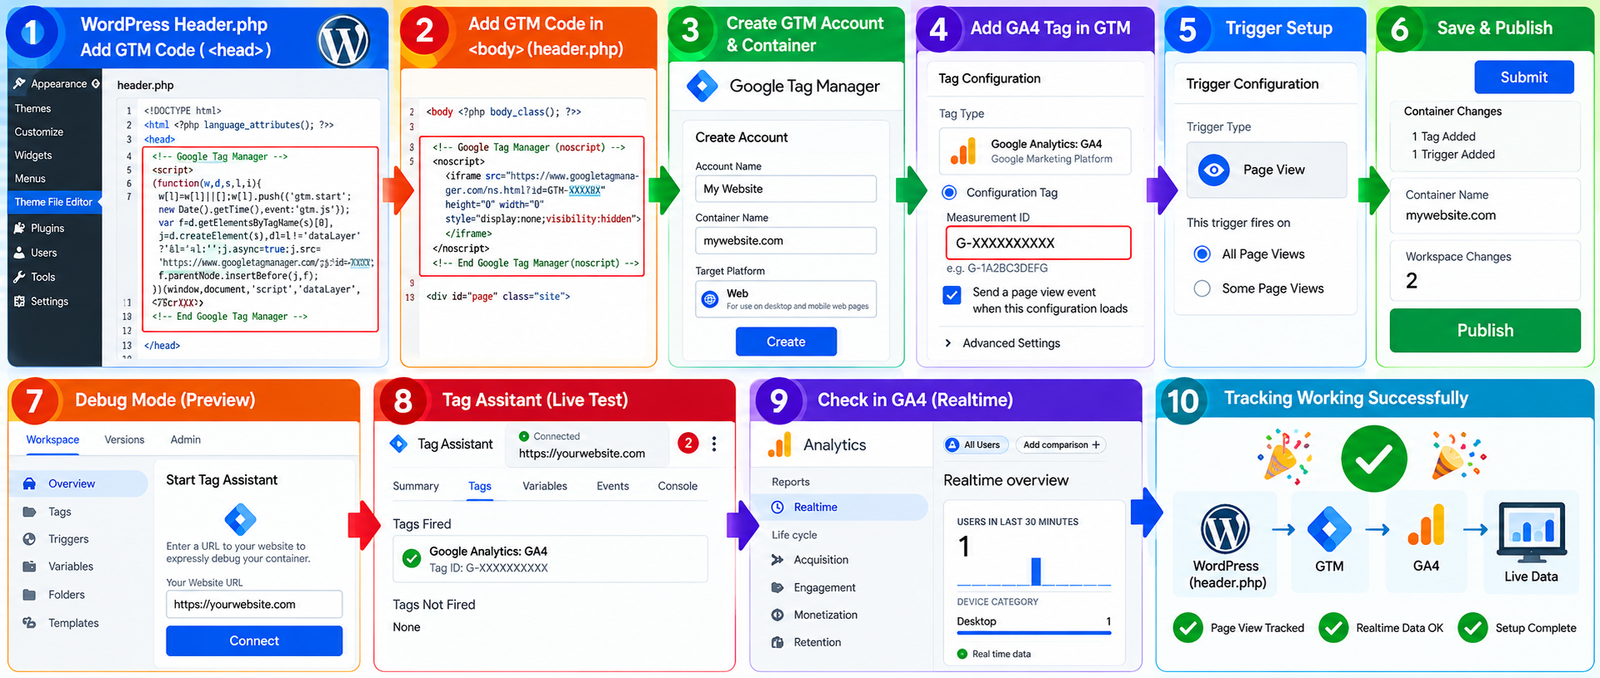
Tracking website activity correctly is one of the most important parts of understanding how users interact with a website. In this practical implementation, I worked on setting up Google Tag Manager and Google Analytics 4 on a WordPress website so that important website interactions could be measured, tested and verified.
The implementation covered the complete tracking workflow — from installing Google Tag Manager inside WordPress, connecting the website with GA4, configuring tracking tags and triggers, testing events through GTM Preview and GA4 DebugView, tracking Elementor form submissions, verifying live activity in GA4 Realtime, and finally publishing the tested GTM configuration.
 Click to enlarge ↗
Installing Google Tag Manager on the Website
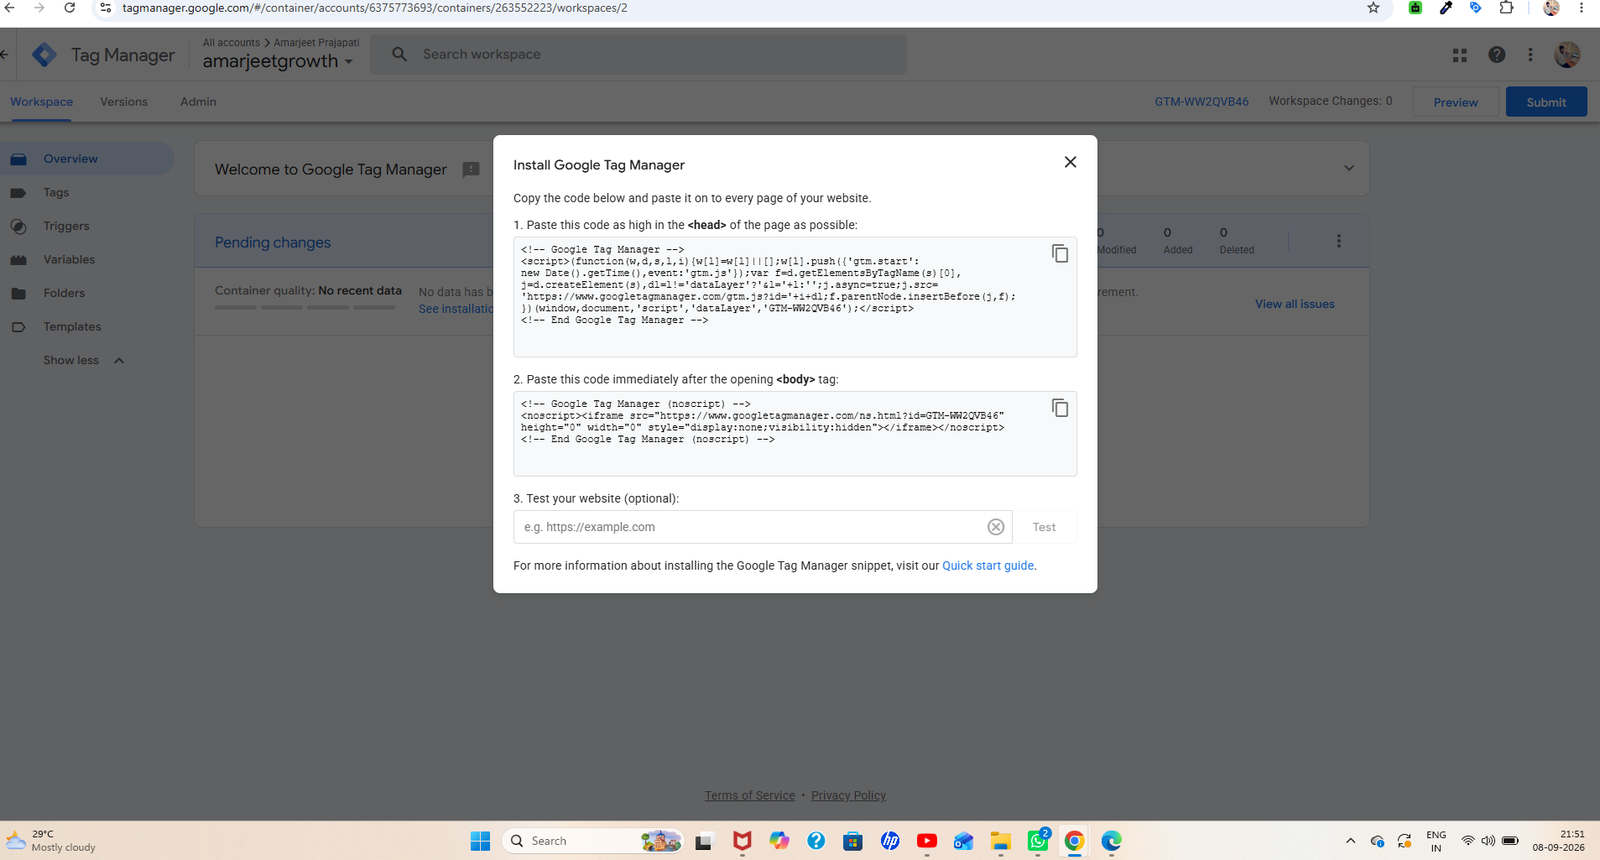
The first stage of the implementation was to prepare Google Tag Manager for the website. GTM provides a centralized environment where tracking tags can be created, configured and managed without having to manually add every individual tracking script to the website.
After creating the required GTM container, the installation code provided by Google was reviewed. The code contains the components required to load the GTM container when a visitor opens the website. This becomes the foundation for the rest of the tracking setup.
Instead of treating analytics as a collection of isolated scripts, the implementation was structured around GTM so that future tracking requirements could be managed from one central workspace.
 Click to enlarge ↗
Accessing the WordPress Theme Structure
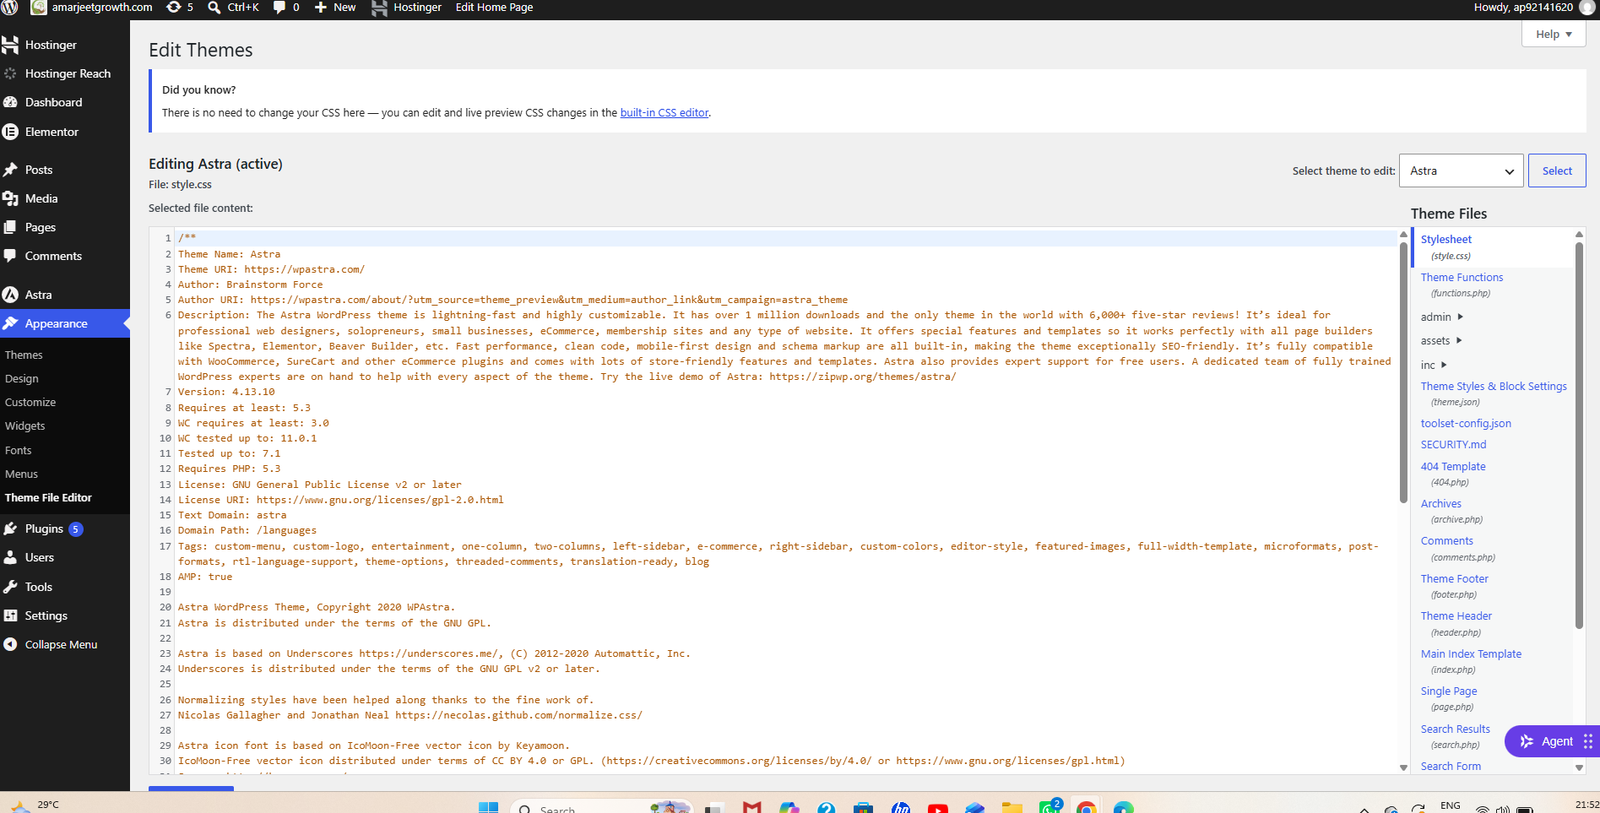
Once the GTM container was ready, the next step was to connect it with the WordPress website. For this implementation, the relevant theme structure was accessed so that the GTM installation code could be placed in the appropriate part of the website.
Understanding where tracking code belongs is important because analytics implementation is not only about copying and pasting code. The code needs to be inserted in a location where the browser can load it correctly as the page is rendered.
The WordPress theme environment therefore became the technical bridge between the website itself and the Google Tag Manager container.
 Click to enlarge ↗
Adding the GTM Code to the Website
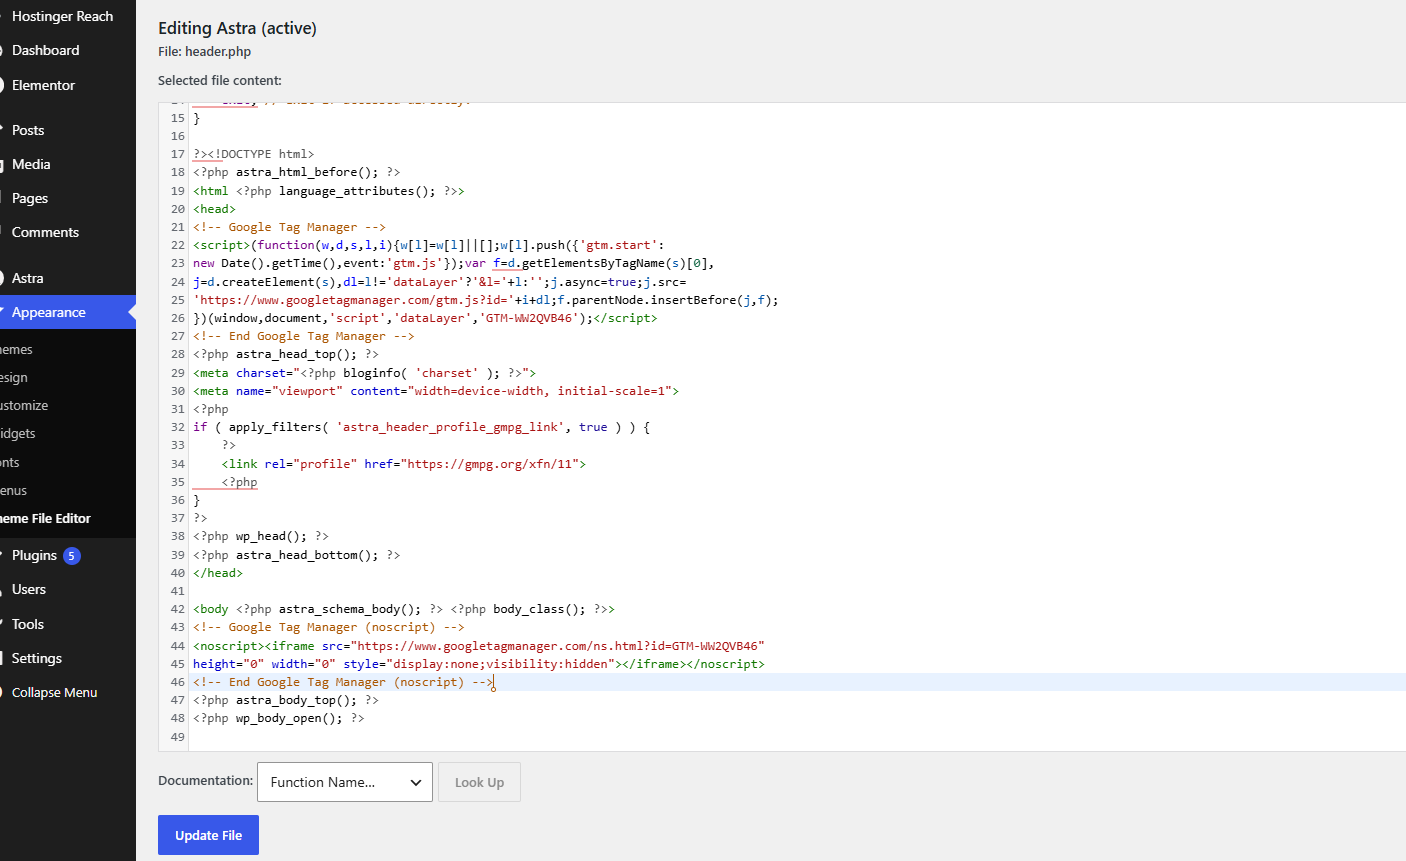
The Google Tag Manager installation code was then added to the WordPress theme structure. GTM normally provides separate pieces of installation code that are intended for different locations within the HTML document.
The purpose of this step was to make sure that the GTM container could load as part of the website's normal page rendering process. Once the code is correctly integrated, GTM can begin receiving events and executing the tags that are configured inside the container.
GTM container script
<!-- Google Tag Manager (noscript) -->
This stage is particularly important because every later tracking configuration depends on the GTM container being available on the website. If the container is not loading correctly, GA4 tags and custom events cannot be reliably tested.
 Click to enlarge ↗
Verifying the Installation with Tag Assistant
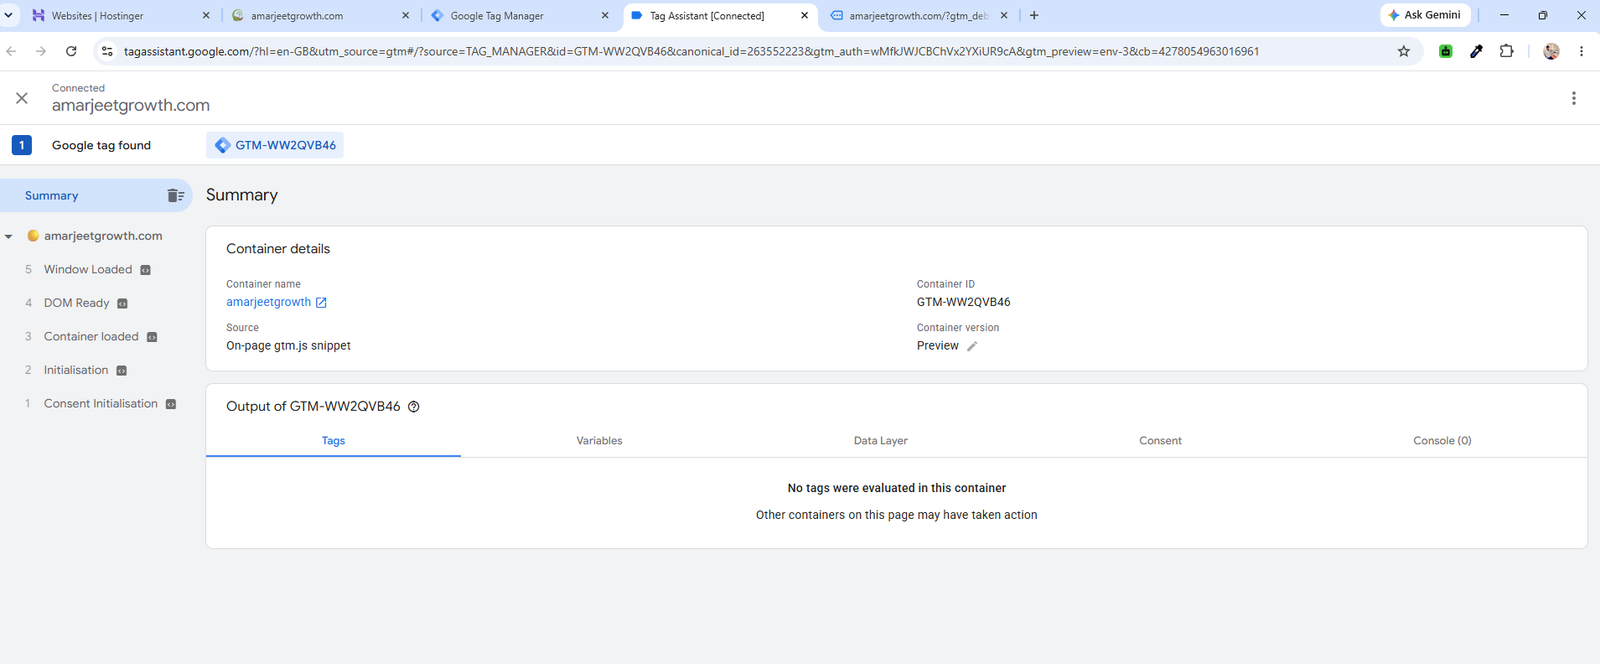
After adding the GTM code, I did not immediately move into production publishing. The installation was first verified using Google's Tag Assistant environment.
Tag Assistant provides a useful debugging layer because it allows the implementation to be inspected while interacting with the website. This makes it possible to determine whether the GTM container is actually being detected and whether the debugging session is connected correctly.
This verification step helps prevent a common implementation problem: spending time configuring tags and triggers inside GTM when the underlying website installation itself is not working.
 Click to enlarge ↗
Using GTM Preview Mode for Debugging
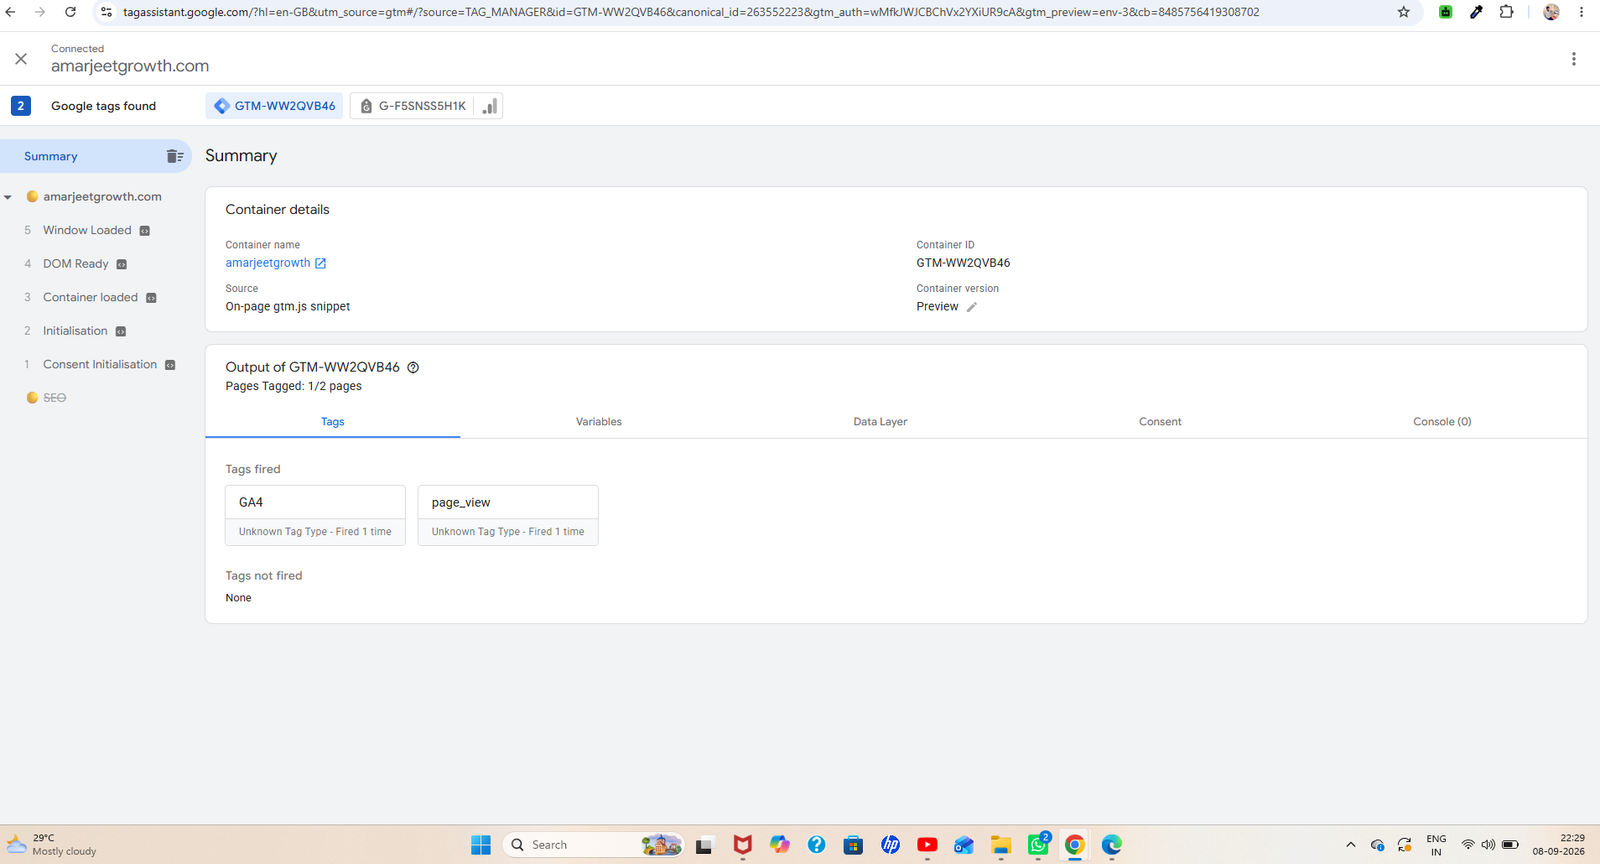
With the GTM installation available, the next stage was to inspect how the website behaves inside Google Tag Manager's Preview mode. Preview mode is one of the most useful parts of the GTM workflow because it allows tags, triggers and events to be examined before changes are published to the live container.
During debugging, the important question is not simply whether a tag exists. The real question is whether the correct event occurs, whether the trigger recognizes that event, and whether the intended tag fires at the right moment.
This event-driven approach makes tracking implementation much more predictable. Instead of guessing whether a tracking tag is working, the GTM preview environment provides a practical way to inspect the complete firing logic.
How the GTM Tracking Logic Works
A useful way to understand Google Tag Manager is to think of the system as three connected components: events, triggers and tags. An event represents something that happens on the website. A trigger defines the condition under which GTM should react to that event. A tag is the actual piece of tracking configuration that executes when the trigger conditions are satisfied.
For example, a visitor opening a page can generate a page view. A visitor submitting an Elementor form can generate a form-related event. GTM can then use the corresponding trigger to determine when a GA4 event tag should execute and send the information to Google Analytics.
This separation between events, triggers and tags makes the tracking setup easier to maintain and debug. It also makes it possible to extend the implementation later when additional business actions need to be measured.
 Click to enlarge ↗
Connecting Google Analytics 4 with GTM
After confirming that GTM was available on the website, the next objective was to establish the GA4 tracking layer. Google Analytics 4 provides the analytics destination where website activity can be collected and analyzed.
Instead of placing multiple analytics scripts directly throughout the website, the implementation uses Google Tag Manager as the management layer. This makes the tracking configuration easier to organize and gives greater control over when specific analytics events are sent.
Page-view measurement provides the basic foundation, while additional interaction events can be added according to the business requirements of the website.
 Click to enlarge ↗
Validating Events in GA4 DebugView
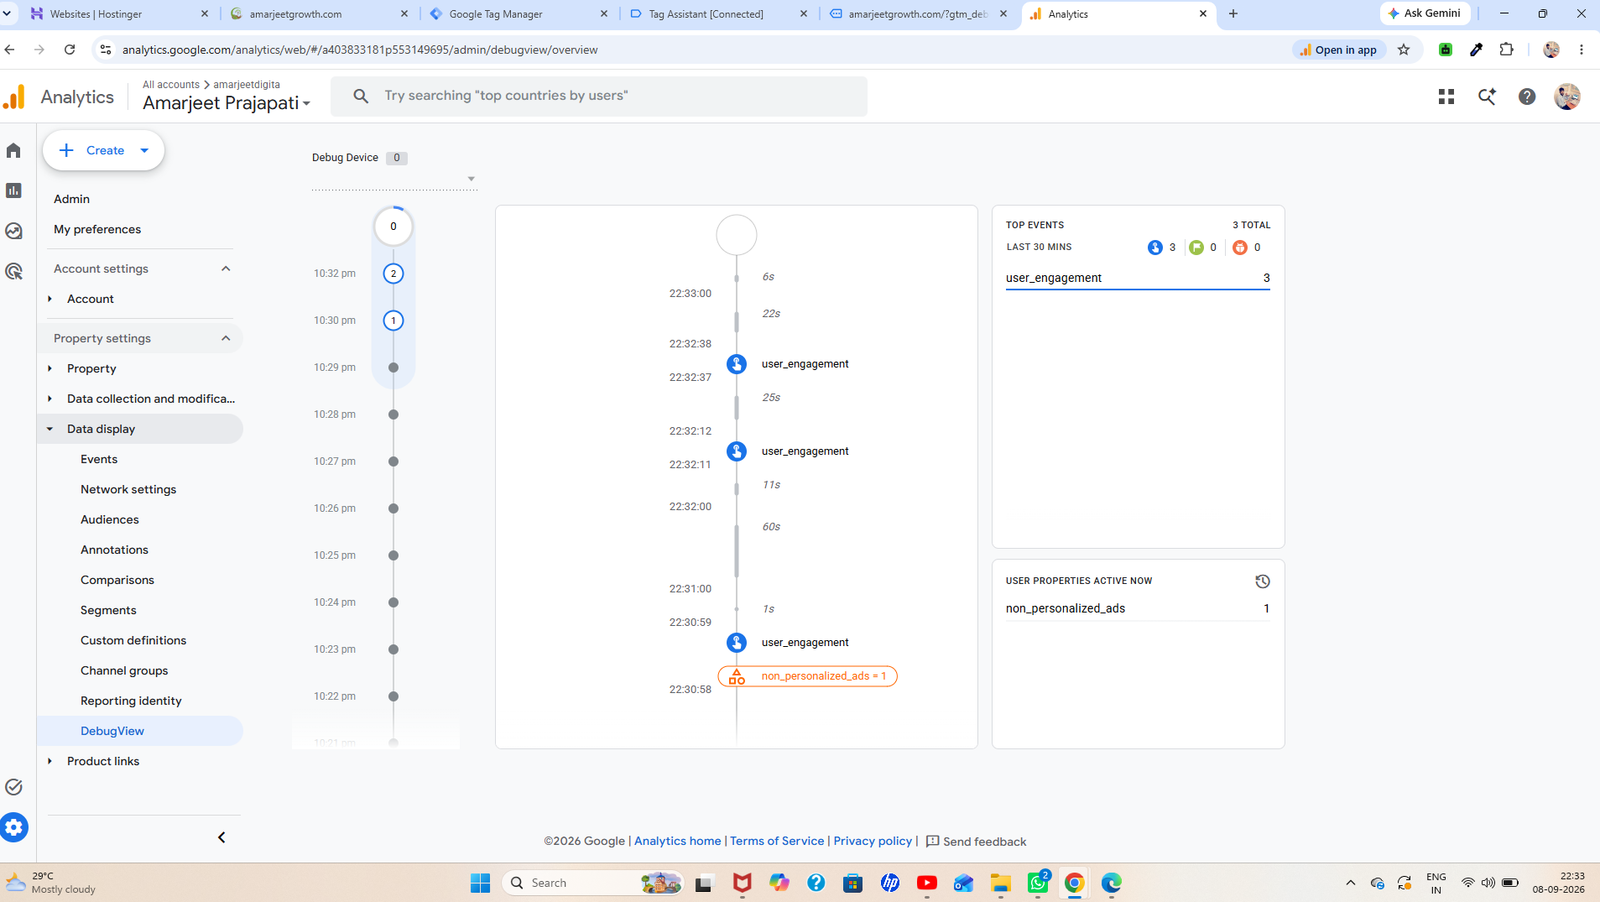
Once the GA4 configuration was connected, the next important stage was validation. GA4 DebugView was used to inspect the events being received during testing.
DebugView is especially valuable during implementation because it provides a much more direct way to understand whether activity is reaching the GA4 property. Instead of waiting for normal reporting cycles, the implementation can be tested while interacting with the website.
Events such as page views and user engagement can therefore be inspected during the debugging process. This gives a practical confirmation that the analytics layer is communicating correctly with GA4.
 Click to enlarge ↗
Tracking Elementor Form Submissions
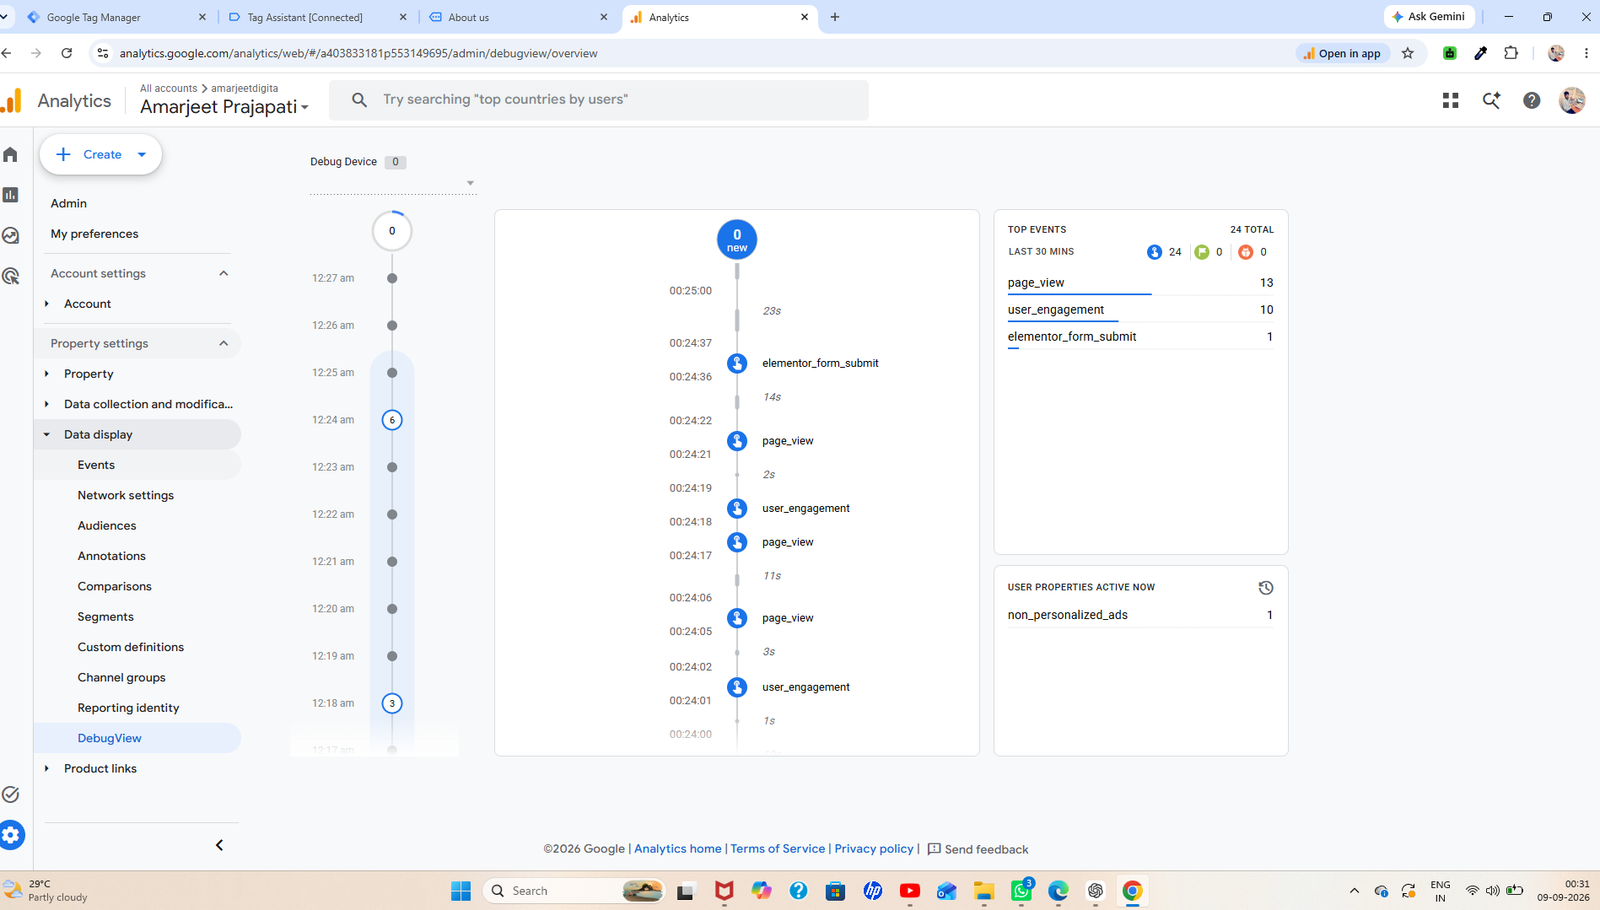
Page views are useful, but for a business website they are usually not enough. A more meaningful measurement is understanding whether visitors actually perform important actions such as submitting a contact or lead form.
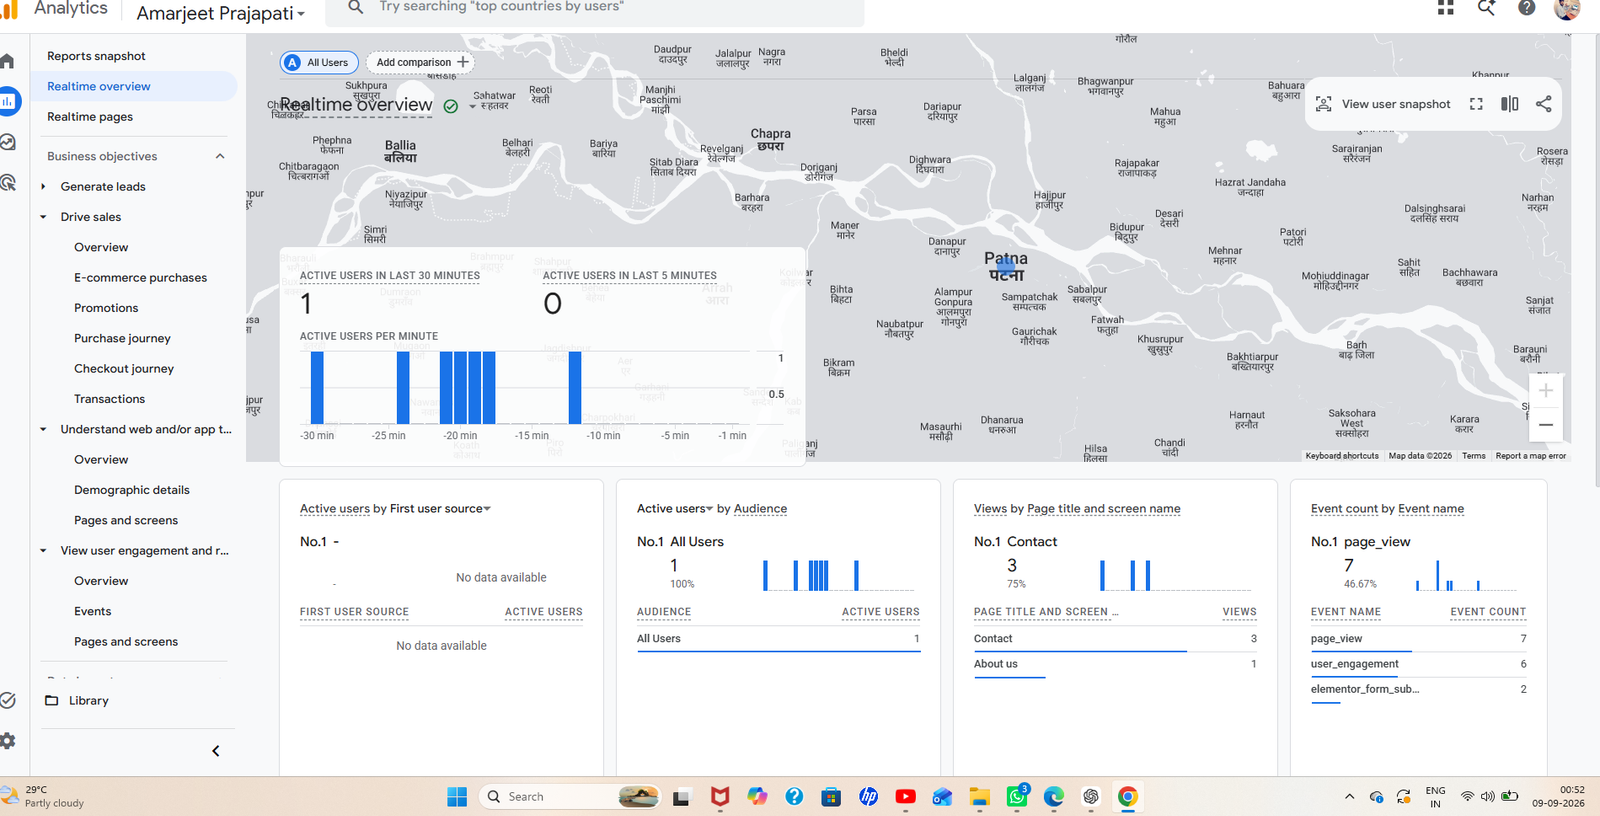
In this implementation, the Elementor form interaction was tested as a dedicated event. The goal was to capture the form submission action so that it could be passed through the tracking workflow and verified inside GA4.
This is an example of how a website-specific interaction can become part of an analytics implementation. Once the event is available, GTM can use a matching trigger and execute the corresponding GA4 event configuration.
From a performance marketing perspective, this type of tracking is particularly important because form submissions are much closer to an actual business outcome than simple page views.
 Click to enlarge ↗
Verifying Live Activity in GA4 Realtime
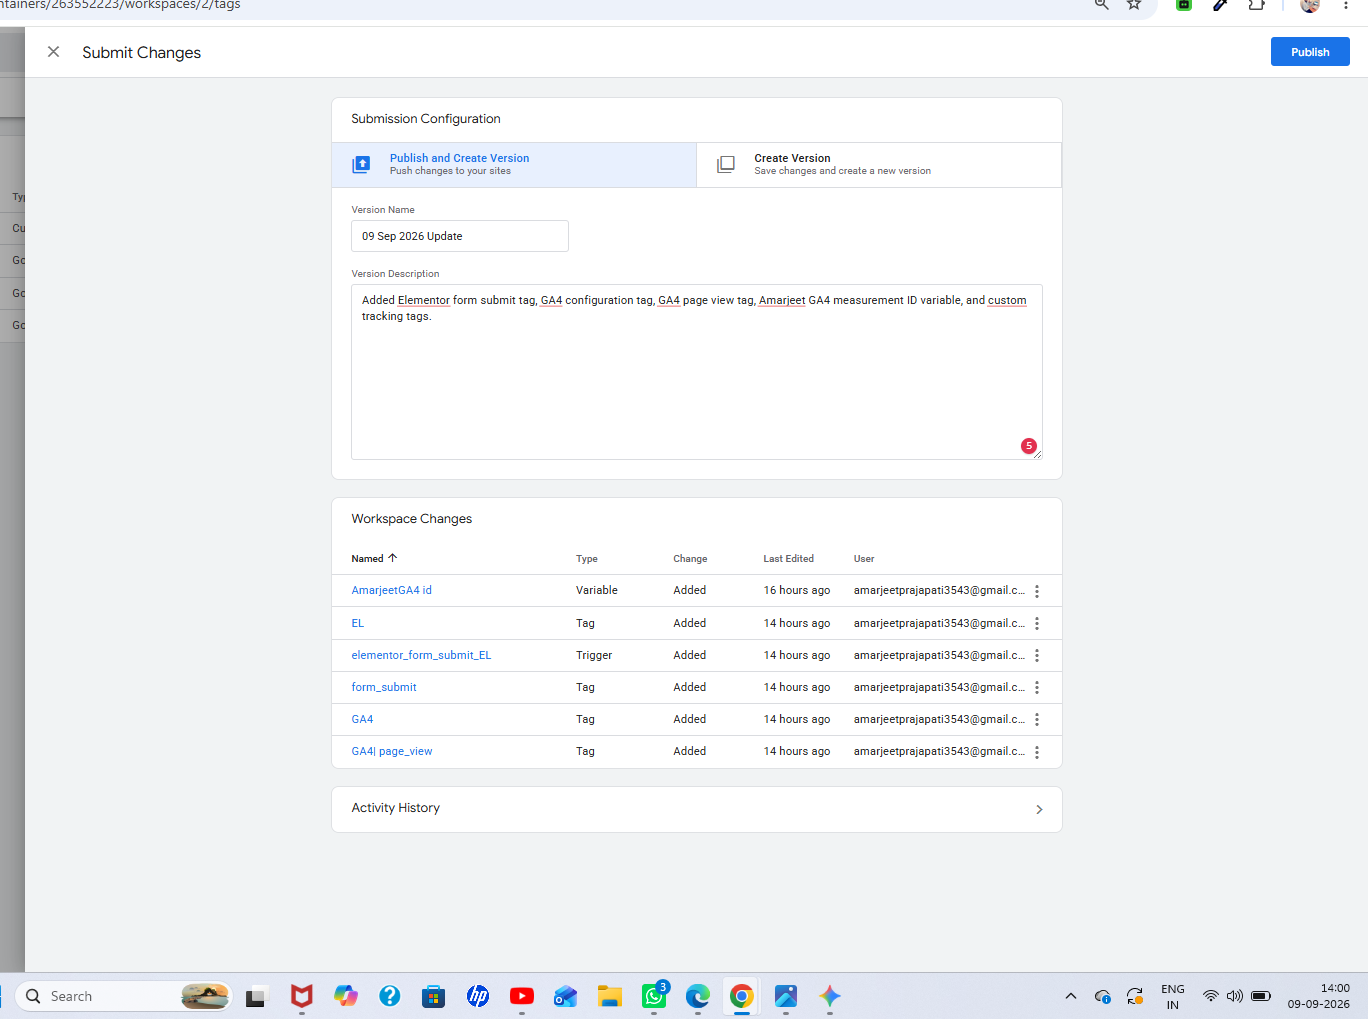
After validating the events through DebugView, the implementation was checked again from the GA4 Realtime reporting environment. This provided another layer of confirmation that website activity was reaching the analytics property.
Realtime reporting is useful because it gives a practical view of current website activity. When testing a tracking implementation, it can help confirm that interactions are not only visible inside the debugging environment but are also being processed by GA4.
Using both DebugView and Realtime creates a stronger validation process because the two views answer slightly different questions during implementation testing.
 Click to enlarge ↗
Submitting the Tested GTM Configuration
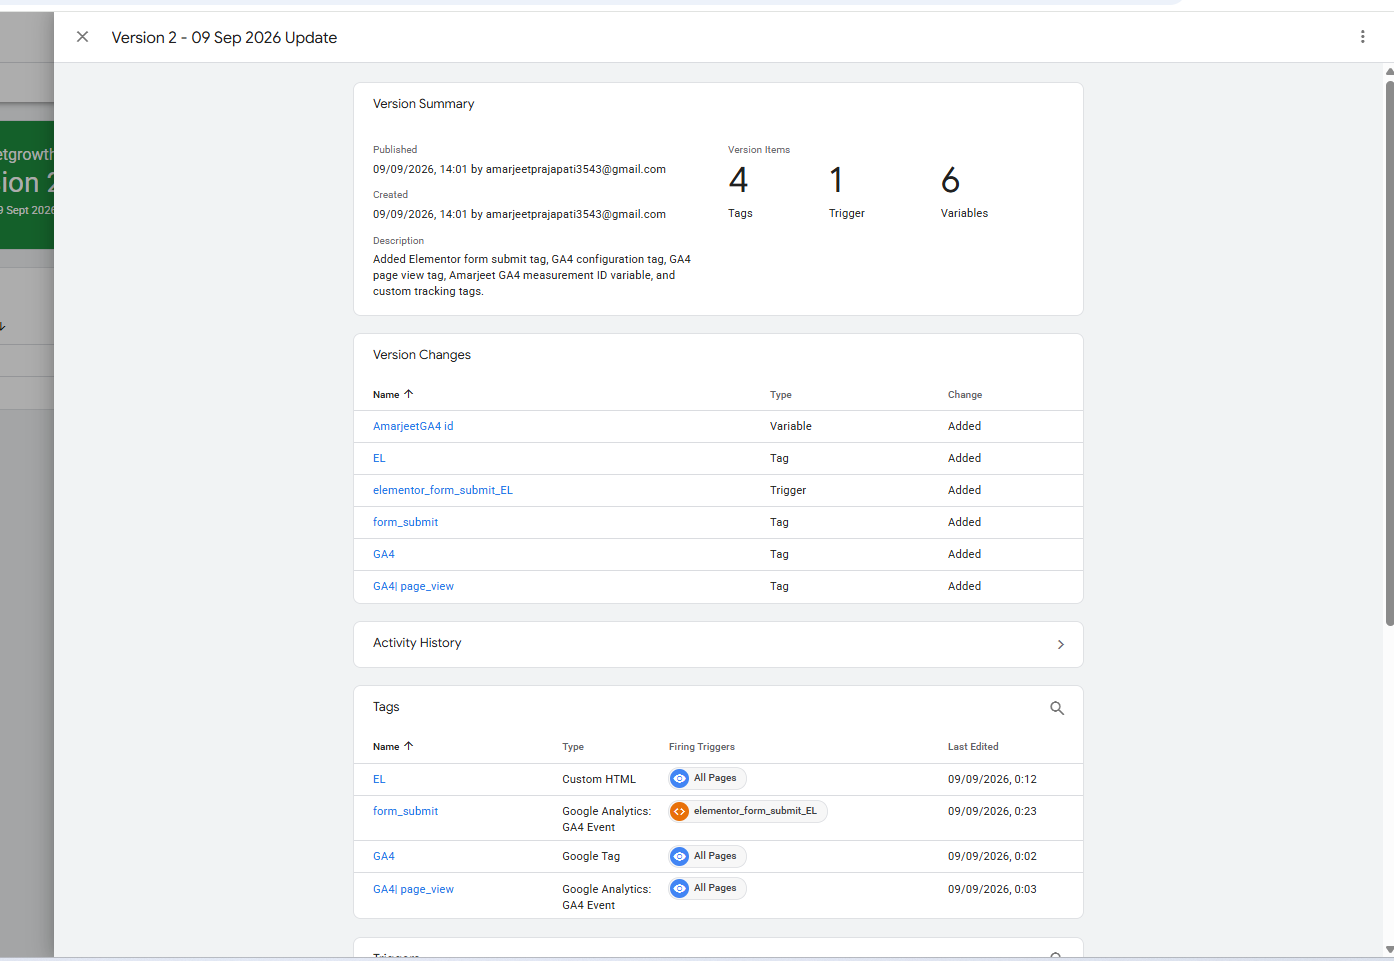
Once the tracking setup had been tested, the next stage was to submit the changes inside Google Tag Manager. This is an important part of a professional GTM workflow because changes should be organized and reviewed before they become part of the live container.
The workspace changes included the tracking components required for the implementation, including GA4-related tags, the Elementor form tracking configuration and supporting variables or triggers.
Giving the version a meaningful name and description also makes future maintenance easier. If a tracking issue appears later, version history provides useful context about what was changed and when it was published.
 Click to enlarge ↗
Publishing and Reviewing the GTM Version
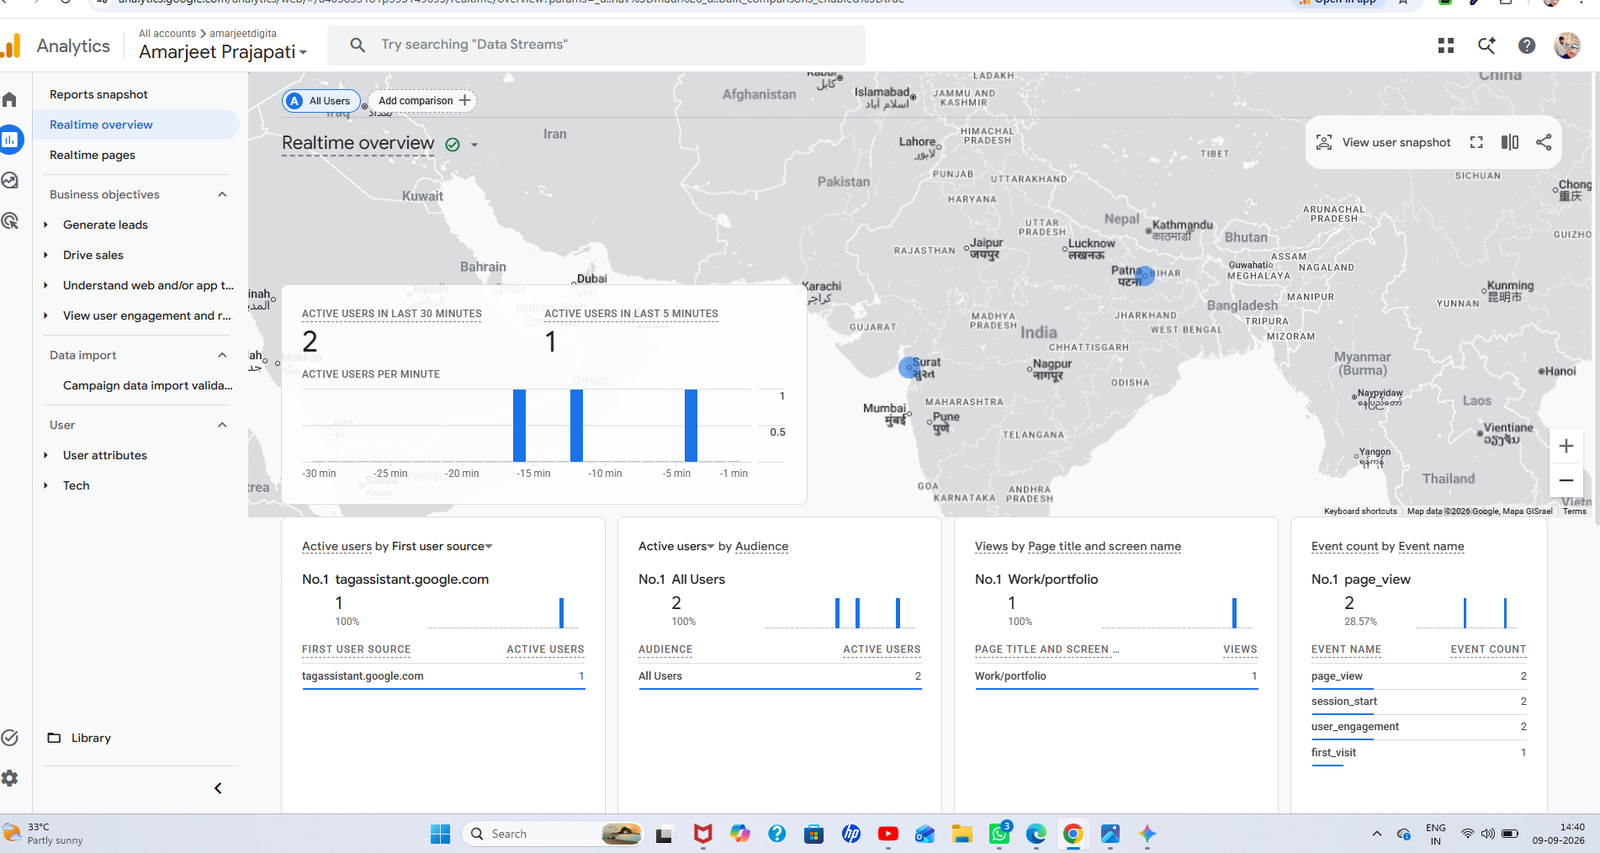
After submission, the GTM configuration was published as a new container version. GTM versioning is useful for maintaining a clear history of tracking changes rather than treating the container as one continuously changing configuration.
The published version provides a snapshot of the tags, triggers and variables that were included in that release. This makes the implementation easier to review and provides a reference point for future updates.
For websites where analytics is directly connected to marketing decisions, maintaining this type of structured workflow is important because tracking changes can affect campaign reporting, conversion measurement and optimization decisions.
 Click to enlarge ↗
Final Verification of the Tracking Implementation
The final stage was to verify the implementation once again from the GA4 reporting side. At this point, the objective was to make sure that the complete tracking workflow had been connected from the website through GTM and into GA4.
The implementation was not treated as complete simply because the GTM tags existed. The important part was confirming the actual data flow: website interaction, GTM processing, tag execution and GA4 event reception.
This final verification provides confidence that the tracking configuration is ready to be used as a foundation for ongoing analytics, performance marketing measurement and future conversion tracking requirements.
Standard Events, Custom Events and the dataLayer
A strong analytics implementation needs to distinguish between common website measurement and business-specific interactions. Standard measurement capabilities are useful for frequently occurring website behaviours, while custom events become valuable when a particular interaction needs to be measured according to the website's own business logic.
The dataLayer is another important part of advanced GTM implementations. It can be used as a structured communication layer between the website and Google Tag Manager. When a website interaction occurs, relevant information can be pushed into the dataLayer, where GTM can read that information and use it for trigger and tag logic.
For example, a form interaction may generate an event name that GTM can recognize. A trigger can then listen for that event and activate the appropriate GA4 event tag. This approach creates a flexible architecture where tracking can be expanded without rebuilding the entire analytics system from scratch.
The Final Tracking Workflow
The completed implementation follows a structured workflow: WordPress provides the website environment, Google Tag Manager manages the tracking configuration, triggers determine when tags should fire, GA4 receives the analytics events, and debugging tools are used to validate the implementation before and after publishing.
The important result is not simply having GTM and GA4 installed. The real value comes from creating a tracking system where important website interactions can be measured, tested and understood.
This implementation provides a practical foundation for future performance marketing activities such as lead measurement, conversion analysis, campaign optimization and deeper user interaction tracking.
Have a Website or Tracking Project?
If you need help with WordPress development, Google Tag Manager, GA4 tracking, conversion tracking or performance-focused website implementation, feel free to get in touch.